Set Reporting Period
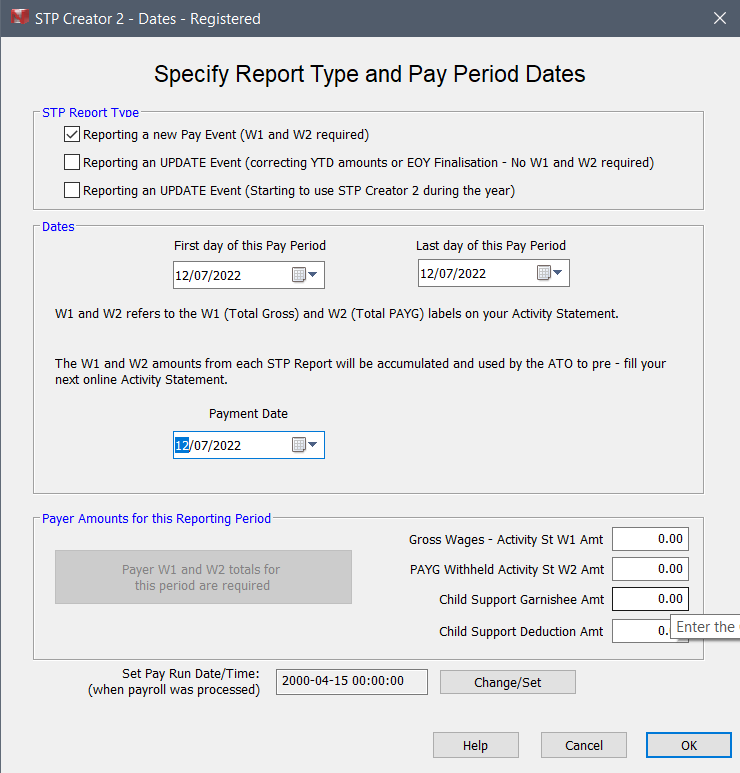
When you first open this screen, it appears as below (with today's dates):
STP Report Type
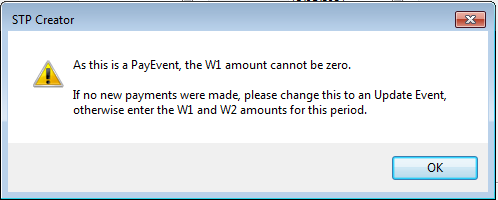
Pay Event
Use this for reporting regular payroll. Use this for Full File Replacements as well. A Pay Event requires the Payer W1 W2 and Child Support amounts for the reporting period to be entered. The W1 amount cannot be $0. If there is no W1 amount, use an Update Event.
Update Event
Use this for reporting an Update. An Update is a correction to payroll amounts reported earlier. An Update is also used to send codes (such as JobKeeper or JobMaker codes) as well as Final Indicators. No Payer W1 W2 or Child Support amounts are reported with an Update Event. If reporting an Update Event, use today's date as the 'Update Date', unless you are doing an update for a prior year, in which case use 30 June of the prior year.
Update Event - Starting to use STP Creator 2 during the year
Use this for reporting a Previous BMS ID as an Update Event when you migrate from STP Creator (or any other STP software) to STP Creator 2 during a payroll year. See Previous BMSID for more information. No Payer W1 W2 or Child Support amounts are reported with an Update Event. If reporting an Update Event, use today's date as the 'Update Date'.
Dates
On this screen you need to select the dates for the Pay Period you are reporting on as well as the Payment Date.
Payer Amounts for this Reporting Period
Complete the W1 Amount, W2 Amount, Child Support Garnishee Amt and Child Support Deduction Amt fields for this period from your payroll records, as well as the Pay Run Date Time as per example below:
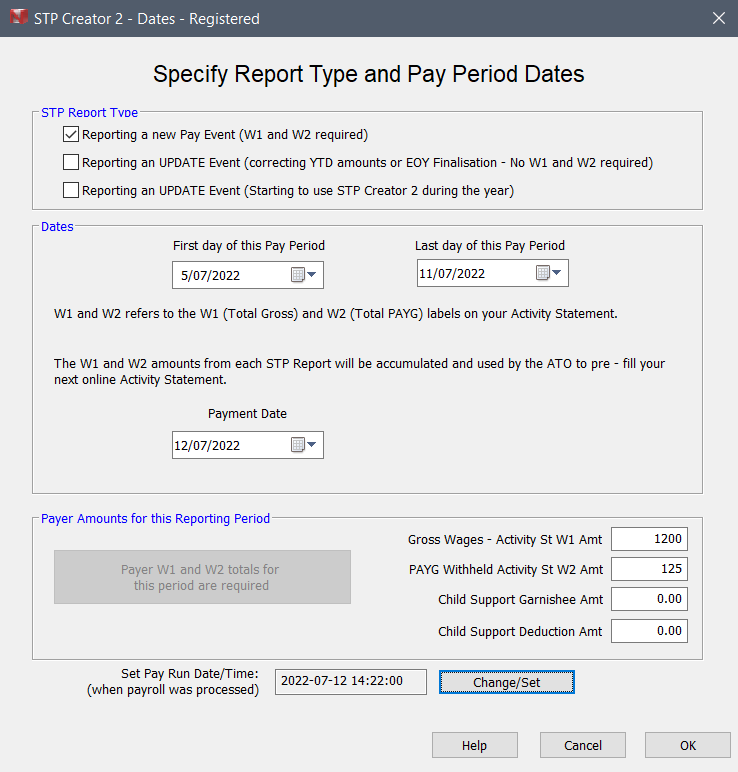
Set Pay Run Date/Time
When reporting a Pay Event, with Phase 2 the ATO requires the Date and Time the Payroll was processed in your system. This is not the date and time this STP Report is being generated, but rather when the payroll itself was processed. Use your local time, STP Creator will adjust for UTC based on your time zone.
The date should be on or before the Payment Date, it cannot be after the Payment Date. The idea is you cannot make the payment until you have processed the payroll.
Click OK button to close this screen and continue to the final step.
Messages
Pay Run Date/Time cannot be AFTER the Payment Date
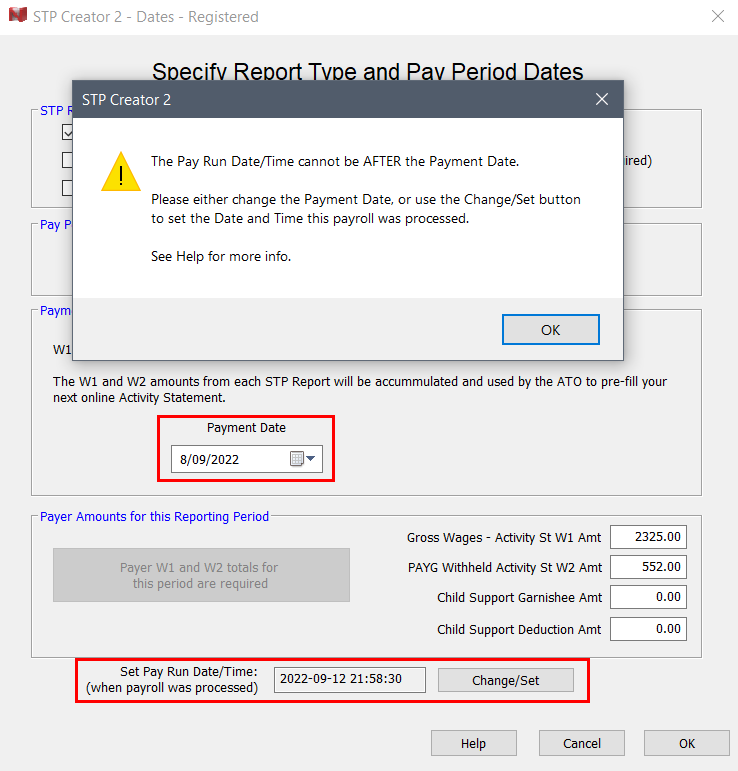
The ATO requires the Pay Run Date to be on or before the Payment Date. The ATO figures you can't actually pay an employee until you have processed the payroll in your system. If the Pay Run Date is AFTER the Payment Date, the ATO will reject the Report.
To avoid this message, click the Change/Set button and select the Date/Time the payroll was processed (or should have been processed), ensuring this is on or before the Payment Date.
Buttons
First day of this Pay Period
Select the relevant Date. For example if you do payroll on a weekly basis, select the first day of the pay week. If you are a micro-employer who reports quarterly, follow the ATO guidelines for which dates to show.
Last day of this Pay Period
Select the relevant Date. For example if you do payroll on a weekly basis, select the last day of the pay week. If you are a micro-employer who reports quarterly, follow the ATO guidelines for which dates to show.
Payment Date
Shows the Date on which you made the payroll payments. This will usually be today's date, as STP Reports must be sent on the payment date. If you are a micro-employer who reports quarterly, follow the ATO guidelines for which dates to show.
W1
Enter the W1 amount for the Pay Period covered by this report. W1 is the Activity Statement label for Total Salary, Wages and other payments.
W2
Enter the W2 amount for the Pay Period covered by this report. W2 is the Activity Statement label for Tax withheld from payments reported at W1.
Child Support Garnishee Amt
Enter the Child Support Garnishee Amount for the Pay Period covered by this report.
Child Support Deduction Amt
Enter the Child Support Deduction Amount for the Pay Period covered by this report.
Help
Access on-line Help.
Save
Clicking this button will 'save' or 'accept' this data and return to the Main Screen. Once this screen is saved, and warning free, the word Completed will appear beside the Assemble YTD button on the Main Screen.
Cancel
Close this screen without saving any changes. This will bring you back to the Main screen.